


Table of contents
Introduction
Historically, project management software offered extensive support to project managers but dropped the ball when it came to resource management. With the advent of both Microsoft Project Professional and Microsoft Project Online, resource managers now have the resource management tools necessary for quickly and easily managing work, cost, and material resources. This powerful resource management software gives resource managers the ability to execute a wealth of key tasks, including:
- approving, rejecting, or modifying resource engagement requests;
- managing a pool of resources;
- planning resource capacity; and,
- Building teams.
Let’s walk through each in detail to give you some insight into just how productive a tool cloud based tool like Project Online and its resource management features can be.
Reviewing incoming resource engagement requests
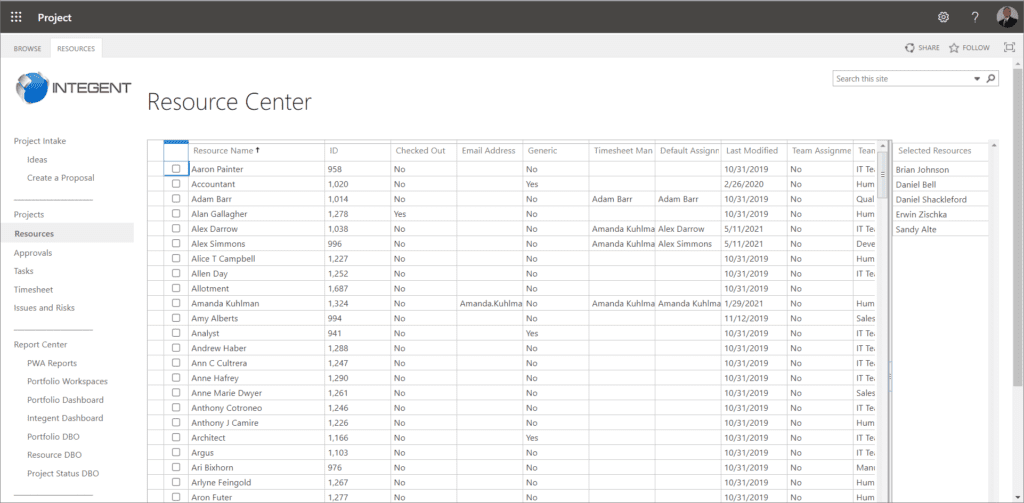
As part of resource management planning, Project Online gives you an overall view of a resource that allows you to determine whether you can accept, reject, or modify any incoming resource engagement requests.
After your project manager submits a request, you can go to the Resource Center to review these requests. Engagement requests to review are listed as ‘Proposed’ in your list of resources. If everything looks above board, you can select the resource check box and click on ‘Accept.’

This then releases the resource back to the Project Manager, who can assign it as needed to tasks that align with that request. How's this for improved resource management processes!
You can make changes, as need, as well to four parameters that define that resource:
- Resource Name
- Committed Units
- Committed Start
- Committed Finish
One of the most useful tools here is that you can swap out a generic resource for a specific one. In other words, if a general role is selected for a work resource (i.e. developer) you can swap this out for a particular individual that you know is available and can fulfill the request parameters.
A resource manager will often query on remaining availability, skill sets, and other data points to determine the optimal resource. Once you make any changes to the resource request, Project Online sends it back to the project manager who can then make more changes and resubmit the request or else accept it, as is.
In some scenarios, even small changes to the request will not make it acceptable. In these situations, you can reject a request outright. Project Online does give you the capability to submit comments with this rejection, which can make it much easier for your project manager to submit a new request that is more realistic. What's important is ensuring resource utilization is optimal with no over-allocations.
Managing your resource pool
Managing an enterprise resource pool is streamlined in Microsoft Project Online, as well. You can manage these work resources individually or in bulk. For example, if you push out a Project Web App site to a user, you can then easily add them as a resource in your project. When adding this resource, you can also assign multiple attributes to that user, including but not limited to whether that resource needs approval for assignments, the resource’s base calendar, and even start and end dates for that resource.
You can also bypass this manual entry and run an automatic import for long lists of resources using an external data file in conjunction with Project Professional. File formats supported by Project Online include:
- Project file formats: .mpp and .mpt
- Excel file formats: .xlsx, .xlsb, .xls
- .txt
- .csv
- .xml
When importing any list of resources no matter the file format, make sure to include a display name at a bare minimum. All other defining resource information you want to include is up to you and you can map these fields to their appropriate counterparts in Project Online after import.
Planning resource capacity
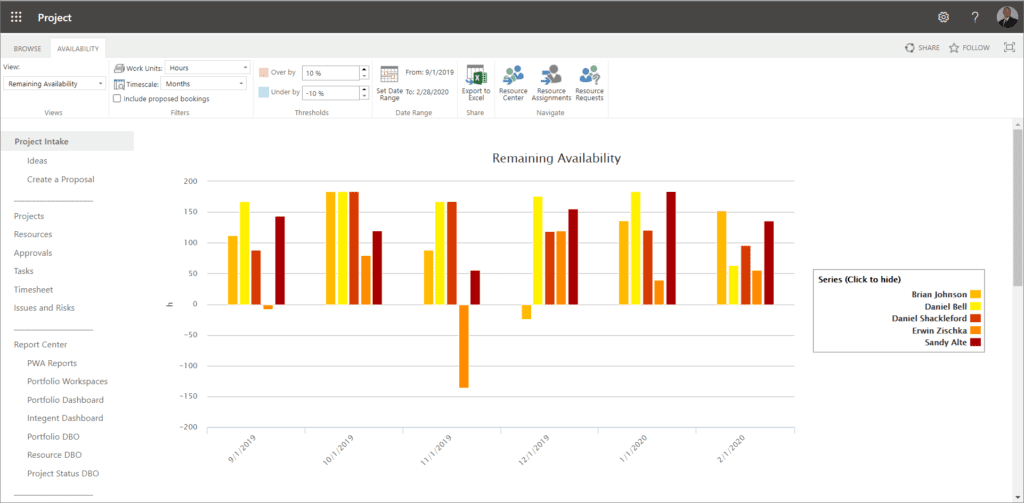
Of course, when you are managing resources, it is of vital import to know when they are overbooked or when they have hours available for projects. Doing this in Project Online is quite easy. Select any resource you want to review in the Resource Center, then click on ‘Capacity Planning.’ Under View in the Availability tab, you can then select ‘Capacity and Engagements Heatmap.’
This view gives you a quick visual way in which you can ascertain the availability of a resource as well as their resource allocation. If that resource has a good balance between their engaged time and their overall capacity, their hourly capacity will be highlighted in green. If they are currently underused, their hourly capacity will be highlighted in blue.
Finally, if that resource is overused and needs to have some of their work reassigned, their hourly capacity will be highlighted in red.
Dialing in on more detail about overextended or underused resources can be readily done by clicking on ‘Resource Assignments.’ This view will display all task assignments associated with that resource, as well as dates and remaining work. By viewing these details, you can then make a more relevant decision when reassigning that resource’s workload or leveraging that resource more productively.
Resource forecasting is also a big part of the Microsoft PPM solution. Understanding if the organization has the capacity to take on new initiatives is critical to maximizing business value.
Building teams from available resources
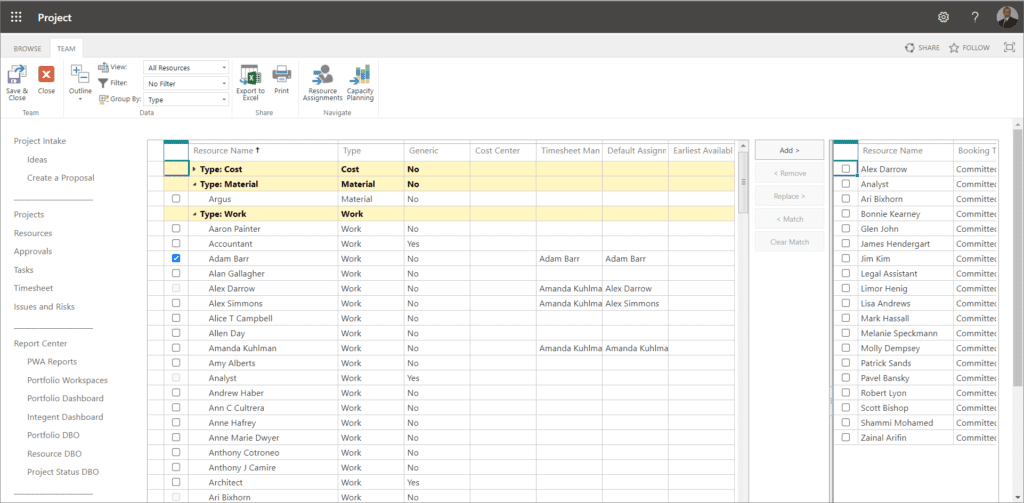
Adding resources to a project team is quick and easy using Project Online. From the Quick Launch menu of Project Web App, select Projects to get to the Project Center, then select the project for which you will be building a team. Next, choose ‘Build Team’ from under Navigate. This will load every available resource into a list on the left side of the screen.
The right side of the screen will be blank; this is where you will load resources to build your new team.
Select any resource from the list on the left side of the screen, then click Add to transfer it to the project team. You can view some summary details on each resource in this list to help you determine whether or not a resource will work for a team. These summary details include Type, Cost Center, and Earliest Available.
Once you have assembled the new team, make sure to select Save & Close to ensure that the team is saved. Now that you have created a team, your project manager can easily assign tasks to each resource.
Of course this functionality is available in the Microsoft Project Online desktop client as well. Team Members are easily added using the Build Team from Enterprise option as part of building the project team.
Managing Resources at Enterprise Scale
When working in an enterprise environment, you are likely working with a long list of resources. In these scenarios, you certainly don’t want to load an entire list of available resources when reviewing resource requests or building teams. It is more likely that viewing only the resources assigned to you will make your workflow faster and more efficient.
To do this, you can simply select individual resources in the Resource Center before initiating a resource request on the Resource Request page. You can, however, also create specialized views to show only certain resources. Microsoft's project portfolio management (PPM) solution does this extremely well.
To bypass the need to manually select resources, you can generate a view that will always display certain resources, such as resources you manage or own. To do this, go to the Server Settings in the Quick Start area of Project Online and click on ‘Manage Views’ in the Look and Feel section.
Once you are in the Manage Views page, click on ‘New View.’ This is where you will generate a view defined by specific parameters, such as owned resources. Select ‘Resource Center” from the View Type dropdown menu, then enter an appropriate name in the Name field (e.g., owned resources.)
You can also add a brief description in the Description field. In the Table and Fields section, select any field you want displayed in the view and add them to the list of Displayed fields.
Finally, you will need to create a Custom Filter control in the Filter section by clicking on ‘Filter.’ Select Resource Name from the dropdown Field Name list, then select ‘equals’ in the Test dropdown list. Type the name of all the resources you own, then click OK, followed by Save on the New View page.
once you have created this custom view, you will be able to select it in the View menu whenever you are working in the Resource Center, which should automatically load your pre-selected resources. Even if you leave the Resource Center and return to it, Project Online should still default to this customized view, saving you time and helping you work more efficiently.
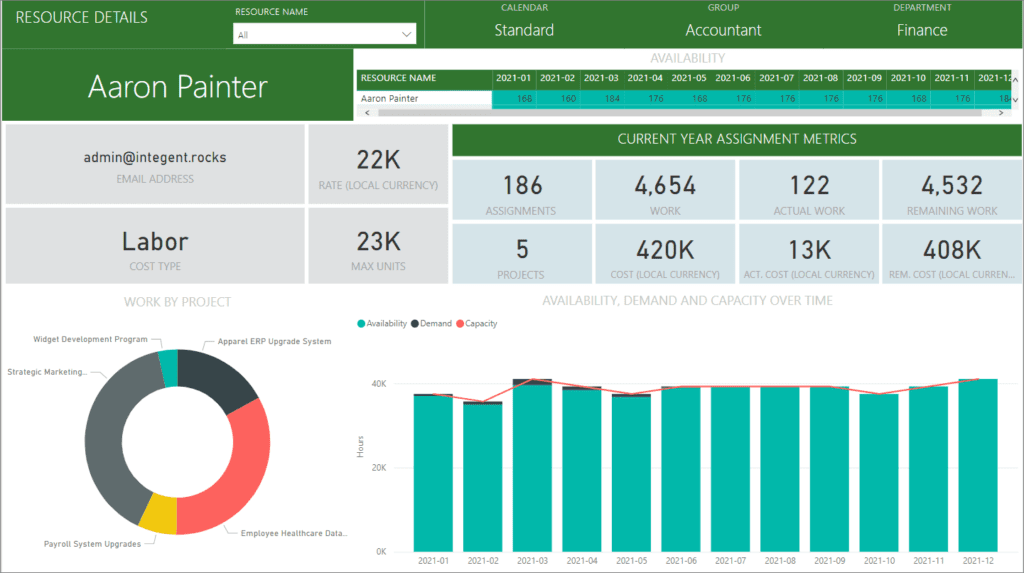
And don't worry, if you cannot configure a view to satisfy your users requirement Power BI is available to create rich and dynamic portfolio dashboards! Include Microsoft Teams on top of that and you have a hub for every day work and executive dashboards!
Resource managers can get a good deal out of Project Online’s dynamic feature set. This solution has certainly filled in many of the blanks left by legacy solutions when it comes to resource management.
As Microsoft pursues new versions of the Project suite, Project Online is certain to become an increasingly powerful tool for managing resources.
