


The “Cache” mechanism for Microsoft Project Server was introduced in the 2007 version. It was in 2007 when the backend of the product was completely re-architected. The product went from one databases to four; Draft, Published, Archive and Reporting. Anyone who remembers this rollout also recalls of the steady stream of issues that plagued that version. One of the issues had to do with the MS Project cache.
Initially projects would get stuck in editing mode as well as encounter other cache-related issues. It was therefore important to know how to clear the cache. Ultimately the MS Project cache enabled several benefits over the previous, no cache system:
- You would not longer have to wait for a project to completely save or publish prior to closing it. This was big, because larger projects would sometimes take several minutes to process. Resulting in you, the user, waiting several minutes before you could move on to other tasks.
- Opening projects was a much quicker process. Yes, this is true. And it was also huge when first introduced. Imagine opening a Microsoft Project schedule that is 2000 or 3000 tasks long. In order to do so, the entire project schedule would need to be transferred over the network. This may be a lan if on the same network or the wan if working remote from the SharePoint farm application server. Suffice to say, the open process could take considerable time. With the cache, upon first opening a project, it is copied to the local cache of the machine you are using & MS Project is installed. What this enables, is that upon subsequent openings of the project, as well as closing and publishing, only the deltas between your local cache and what is on the server would be synchronized, dramatically increasing efficiencies.
With this new functionality comes it’s potential for issues. One of which is that at some point a user may encounter an issue trying to open, save or publish a project. If an issue like this is encountered, quite often it is a result of corrupt cache for the project in question. The procedure below outlines the steps required to clear the MS Project cache.
How to Clear the cache with Microsoft Project Professional
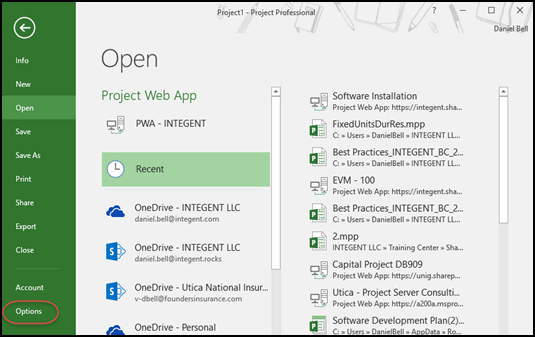
- Click the File tab then select Options in the Quick Launch.
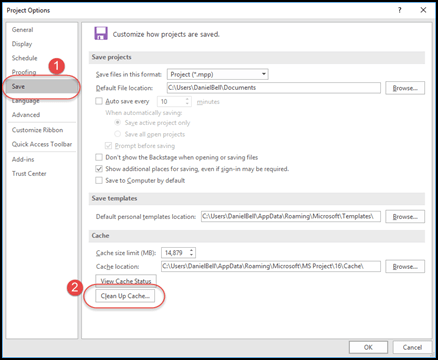
- Once in the Project Options dialog, select the Save (1) page, then click the Clean Up Cache (2) button.
- In the Clean Up Cache dialog perform the following:
a. Select all the projects in the Remove projects from cache section. Use Shift-click to simplify selection.
b. Click the Remove From Cache button.
Note: The screenshot on the left is before we cleared projects from the cache. The screenshot shows the cleared cache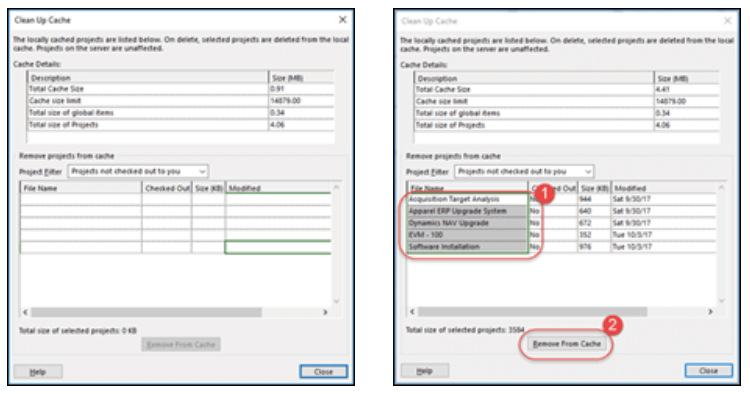
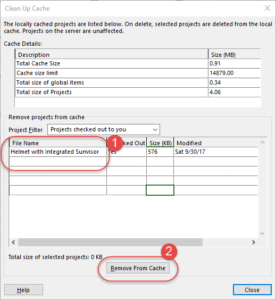
- While still in the Clean Up Cache dialog, change the Project Filter to Projects checked out to you via the drop down list box.

- If there are any projects showing up in the cache now, perform the same procedure and clear them from the cache (Important, ensure you do not currently have any projects opened!)
a. Select all the projects in the Remove projects from cache (1) section. Use Shift-click to simplify selection.
b. Click the Remove From Cache (2) button.
- Click the Close button when finished.
