


Table of contents
Flexible Project for the Web Deployment
Those of us working with Project for the Web have been waiting a long time for multiple instances of the product. Well that time has come. It’s called Flexible Deployment for Project for the Web.
Flexible Deployment, which is part of the Microsoft Dataverse (previously Common Data Service (CDS)) platform. Flexible Deployment enables you to create different environments. And the different environments are created based on organizational, business unit, or team needs.
Previously we had only the default environment. We now have more choices to spin up additional Project for the Web Dataverse environments: Production and Sandbox.
With production environments, the organization can create specific environments that can limit access to data. Such as for an HR department. The Sandbox environment allows for the development and testing of customized solutions for Project for the Web before rolling out.
Flexible Deployment may be used with Project Plan 1, Project Plan 3 and Project Plan 5.
This Video
In this video we demonstrate creating a new instance of Project for the Web.
Project is supported as Default, Production and Sandbox environments. In order to deploy to Sandbox and Production environments, the new environment must be created with a database. In addition, the Enable Dynamics 365 Apps toggle must be disabled.
- Deploying a non-Default environment is done from the Power Platform Admin Center (https://admin.powerplatform.microsoft.com). Login to the Admin center.
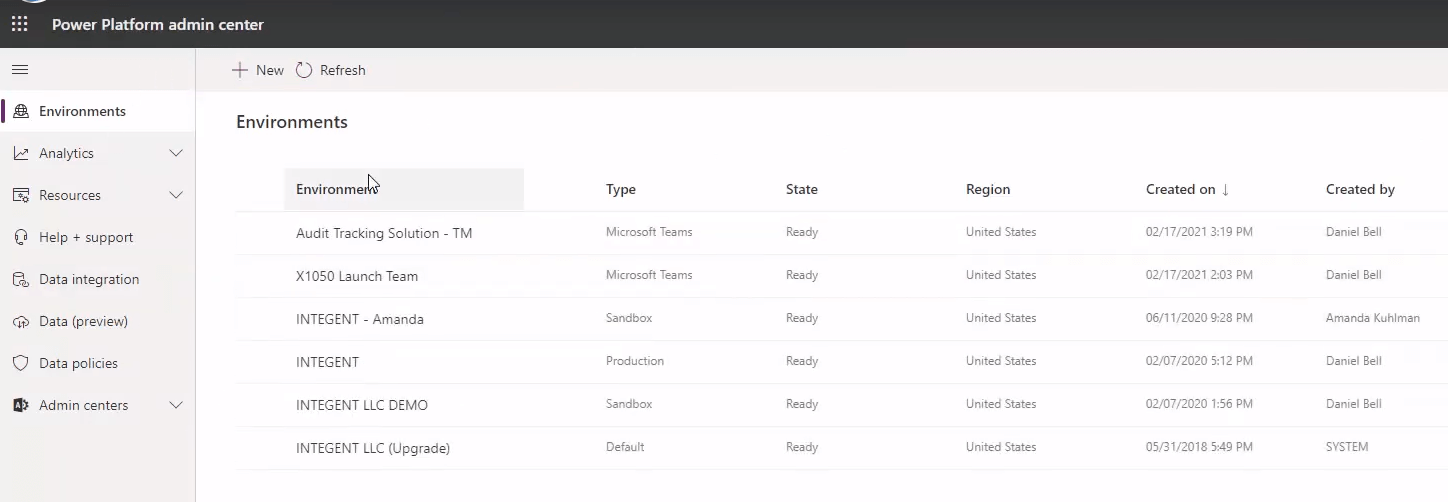
- Once in the Power Platform Admin Center, Click the New link to initiate creating a new environment.
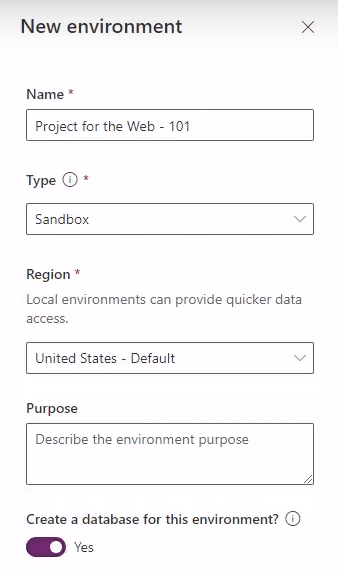
- In the New Environment Dialog, provide a Name for your Environment as well as a Type. Be sure to enable the toggle to Create a database for this environment, then click Next.
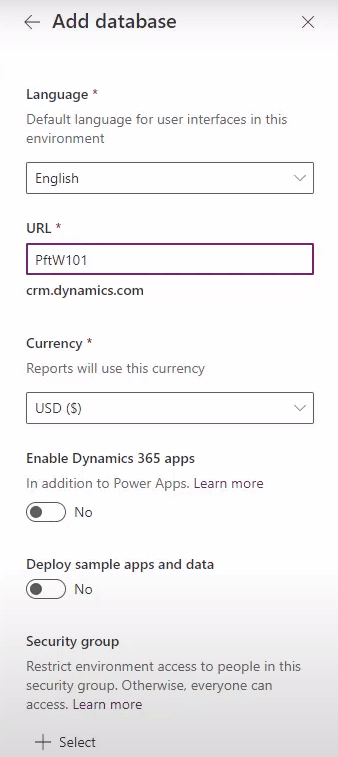
- In the next dialog specify a URL for the environment. Be sure the two toggles are not enabled.
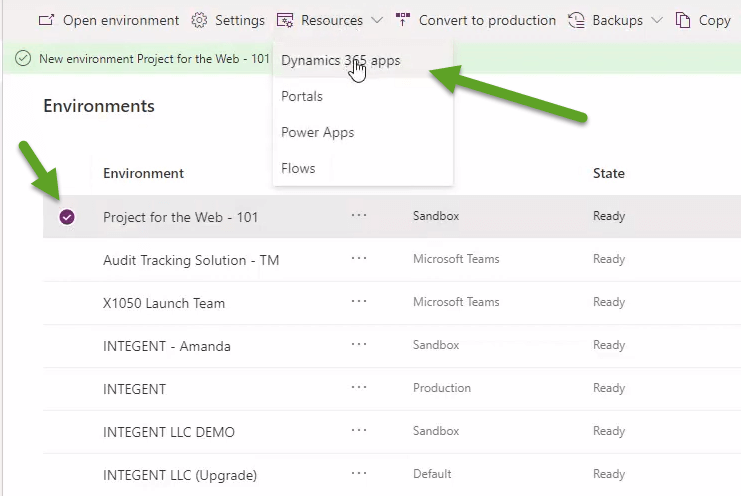
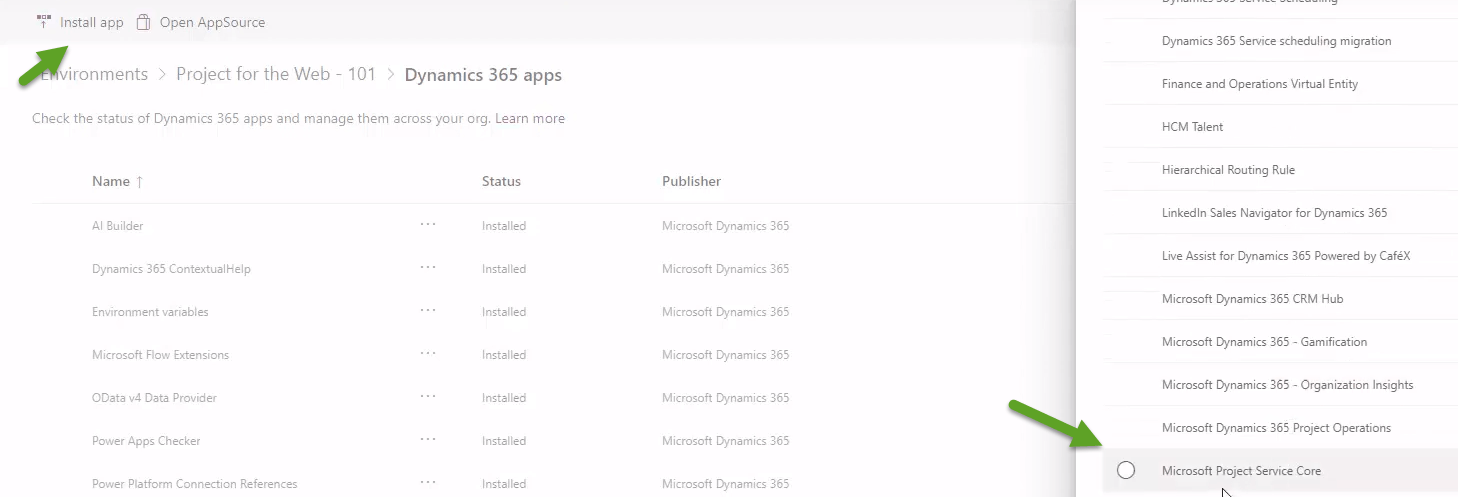
- Once the environment has bee successfully created, again in the Power Platform Admin Center, select the environment then open the Resources > Dynamics 365 apps page from the left-hand navigation menu.
- Next, select install the Microsoft Project Service Core package into your environment by selecting it's radio button, then clicking Next.
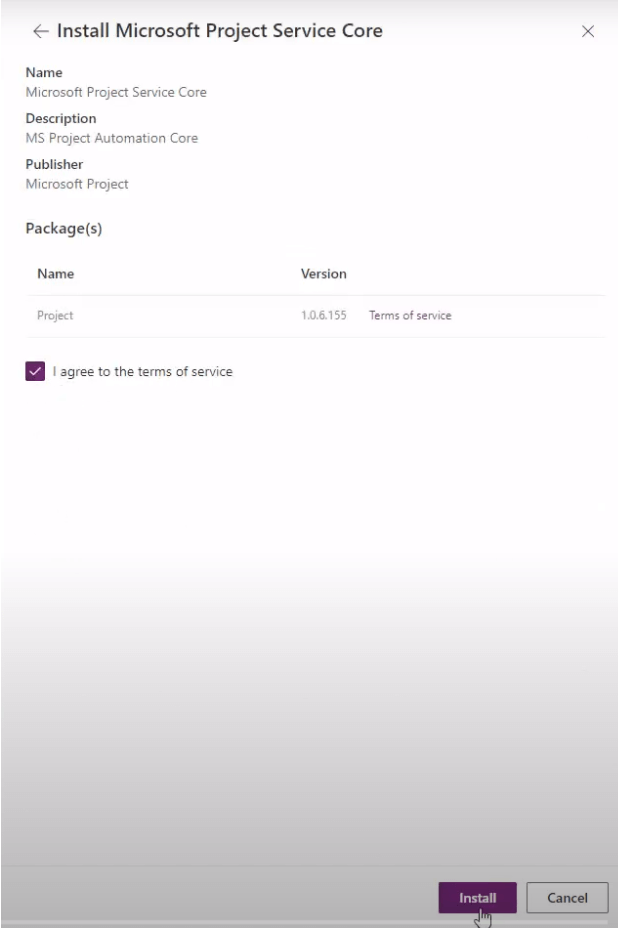
- Then check the box for "I agree to the terms of services" then click Install.
Note: this action takes approximately 45 minutes to complete.
Note: if the Microsoft Project Service Core package is not appearing in the list either the Enable Dynamics 365 Apps toggle was enabled, or the tenant does not have a Project license.
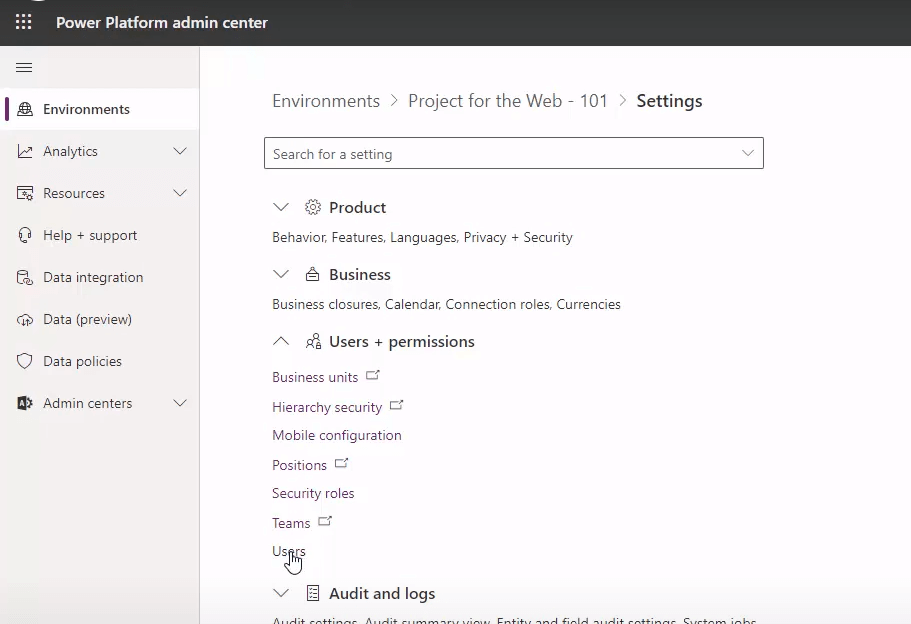
- Upon installation of the package your Production and Sandbox environments will require assigning roles to users. Select Settings while editing the environment, then select Users under the Users & Permissions grouping
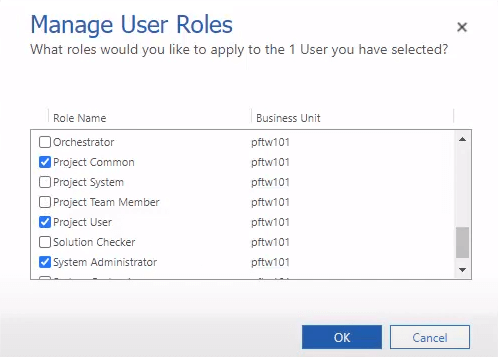
- Assign the Project Common and Project User roles to anyone who will be creating projects by selecting their checkboxes, then clicking OK. Also ensure licensing is assigned.
Note: The default environment does not require this configuration step.
- Once this process is complete, users will use the Project Power App to create and manage projects. Users with the proper roles assigned will see the Project tile appear in Dynamics home.
What is Project for the Web?
Project for the web is Microsoft’s most recent offering for cloud-based project management and every day work. Project for the web provides a simple, powerful work management solution. The solution can be used by project managers and team members to plan and manage work of any size.
What is Project for the Web built on?
Project for the web is built on the Microsoft Power Platform. The Power Platform consists of PowerApps, Power Automate, Power BI, and the DataVerse.
Microsoft Power Platform
The Microsoft Power Platform is powerful, extensible, and built for business processes and functions. By placing project management functionality on the Power Platform, interoperability with Dynamics 365 is increased.
Built on Microsoft 365 Groups, Project for the Web also works with the Microsoft 365 tools you use today. Start collaborating with your teammates on projects.
Microsoft Dataverse
Microsoft Dataverse is a scalable low-code data platform enabling you to create thousands of applications, flows, and intelligent agents. Custom apps may also be developed in Power Apps to help simplify and streamline business processes.
Services Delivered
With Dataverse you can quickly add business value via a data platform that uses extended attributes, out-of-the-box tables.
Increase efficiency
Quickly develop applications and processes to reduce costs and increase productivity.
Power BI
Power BI consists of the Power Bi Desktop and Power BI service. In addition to these items, Power BI brings together software services, connectors and apps. Altogether Power BI helps to bring together unrelated datasources into visually immersive and interactive insights.
Related Links
-
- How to Create a Business Process Flow with Project for the Web
- How to Create a Custom Action Item list with Project for the Web
- How to use Project for the Web custom entities with Power BI
- How to Customize Project for the Web with Entities and more
- What is Project for the Web by Microsoft – A Brief Overview
- Deploying Project
- Project for the Web Consulting
- Microsoft Project Training
- Microsoft Project Online Consulting
- Microsoft Project Online Migration
- Microsoft Project Online Training
- Dynamics 365 Consulting
- Dynamics 365 Project Operations Consulting
- Microsoft Power Automate Consulting
Video Transcript
Hi there folks. I just want to spend a few minutes to show you how to create a another instance or environment, however you want to call it, of a Project for the Web solution. And if you noticed, this capability was just recently introduced and I just want to run through the process to make sure folks understand it. it's probably not as clear as could be.
So let's go ahead and do that, the first thing we need to do is a login to https://admin.powerplatform.com. So let's do that. And there we go and now we can see the environments that we have in this particular Power Platform area. So what I am going to do is click new here, and I'm just going to call this, because I'm going to have a few environments in here, I'm going to just append a number to a here.
I do want it to be a Sandbox as you see you can have sandbox and production. In this case It’ll be the region U.S. to default. The thing I want to pay particular attention to here is I do want to create a database this environment. And upon selecting that click next. Language is going to be in English. What do I want the URL to be. I can just call it Project for the Web and then 101. And it'll be “.crm.dynamics.com. “. We’ll leave it in USD here.
I don't want to select enable Dynamics 365 apps here so make sure you don't select that. And with that said we'll go ahead and click save. And this little Dialogue on the right will go ahead and disappear and then what you'll see is you'll see any environments and it refreshes. Project for the Web 101 was created and now it’s preparing the instance.
And just might take a few minutes here so we'll just wait till it gets done.
Alright so it looks like the instance has been created. Let's go ahead and select it and now what we need to do is go into the resources for this and select Dynamics 365 apps. Because we do need to install an App here. And in order to install that App we just click this install App button here and you'll see the available apps to the right. What we want to do is look for Microsoft Project Server core. Go ahead and select that and click next. And just select agree to the terms of service. And then since I'm already in the Project for the Web instance here it's going to install it to this particular instance. There are other ways to install as well, and then you have to select the instance second but this will do it directly.
So we'll see this refresh then you'll see the Microsoft Project Service Core here and it's going to be a installing and this process actually takes quite a bit of time. Probably upwards of a 10 or 15 minutes maybe even longer than that I'm really not sure. We'll just go ahead and let this take its course.
Hey there folks. So it actually took about 40 minutes or so for the Microsoft Project Server Core to complete which was quite a bit of time. Now what we need to do is actually assign the users who are going to use the environment to a couple of roles within the system. I'm not going to assign a group at this time I am going to keep it simple & assign the user I’m currently logged in with. This is actually a necessary configuration step.
So let's go back to the environment I'll just click on the environment name in the breadcrumbs here. And then what I want to do is click on settings which open up some of the settings for this particular environment. And there we go and what I want to do is access users and permissions right here so I click on this drop down.
And what I want to do is again I want to manage roles for a specific user, therefore, I'll go ahead and click on user and there is the user I am currently logged in with. I'll go ahead and select the user. And this will launch another window. And from there we'll be able to manage the roles for that user account.
And there we are, we're now into the settings for the user account. What we want to do is locate manage roles right up here. Go ahead and click on that and this brings up the roles that we can actually assign to this particular user account. What we want to do is find the project and we're going to assign project common and project user as the two roles that we want to assign here.
And this will allow this user to go ahead and access what we need to do within this Project for the Web environment. Click okay. And the process will take place and assign the roles. You know what we can do is go back to our environment here.
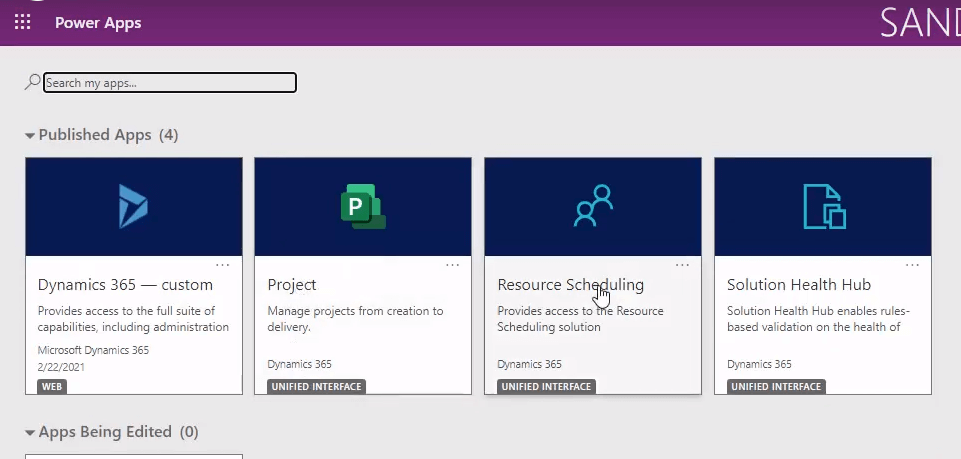
And let's go ahead and click on the environment. And there we are now we're back to the environment so we want to do is open it. So we click on Open Environment here. And this should bring up some tiles. One of the tiles should be Project and there it is you can see. So it's project and resource scheduling are the two that you use together for Project for the Web.
if we go ahead and click directly on this tile it should launch our Project for the Web environment. And there it is. So we have no projects currently but those that are familiar with it you know you click on new project and add a project here. And of course there's the resource area as well. Therefore we can continue to or actually start to add resources here, and create bookings and so forth.
And there you have it. The process is pretty straightforward. Again we wanted to document to help people figure out how to do this. We’ll go ahead and provide a link to your where this short procedure is actually written within the Microsoft documentation.
Hope it helps you folks if you have any comments questions or suggestions feel free to contact us look forward to hearing back thanks so much and have a great afternoon
This is reposted from the Project blog.
