


In Step 6, we looked at defining and assigning resources to the tasks in our schedules. Once you’ve done that, it’s time to take a closer look at what activities are actually driving the schedule. For most of us, the minute we start the project we’re already behind schedule, right? There never seems to be enough people to get the work done in the time allocated…
Identifying the Critical Path in your schedule can help by highlighting the activities that directly impact the project end date. Basically, the Critical Path is the series of tasks that determine the overall project duration. It may not include what you deem to be the “most important” activities, but it certainly shows you which activities need to be closely monitored and protected so that the project end date does not slip.
Another important reason to find those critical tasks is that it quickly shows you which tasks to focus on if you want to shorten the duration of the project. If you have extra resources (yeah, right) with the appropriate skill set, adding them to critical tasks can reduce the overall project duration. So to find the Critical Path in your schedule:
- Select the Format Ribbon
- Check the box Critical
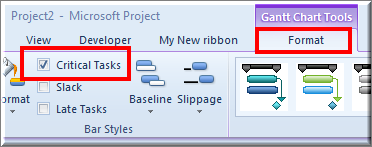
The Critical Tasks will be highlighted in red on the Gantt Chart.
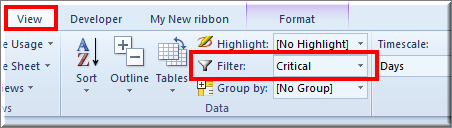
You also apply a filter to display only the critical tasks in your schedule by:
-
- Select the View Ribbon
- Select the dropdown arrow next to Filter
- Select Critical
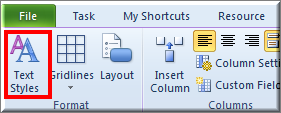
The last tip I’ll offer you on working with the critical path in your schedule is to edit the font of all critical tasks so they show up differently in the table:
- Select Format Ribbon
- Select Text Styles
-
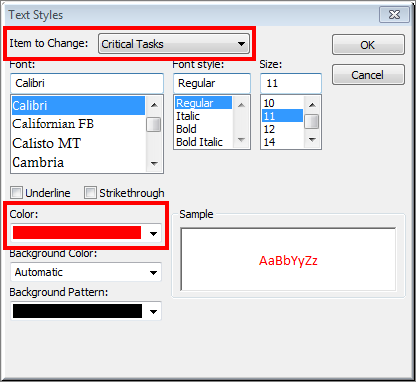
- In the Text Styles dialog box, select the dropdown arrow next to Items to Change and then choose Critical Tasks
- I like to change the color to red but you can format the text however you’d like
-
Keep a watchful eye on those critical tasks!
Read all 8 Steps!
Happy Scheduling! ![]()
