


Continuing with our 8 Steps to Success, this week we’ll focus on Step 2: Entering the Tasks and Deliverables. Step 1 was to Define the Project which basically means setting the important options and making sure you have your calendars in order. If you missed it, go ahead and click the link so you can check it out!
If you are reading this, chances are you already know how to type in task names into the table in Microsoft Project. (If not, call me because we need to chat). ![]() For now, let’s focus on organizing those tasks in a meaningful way so you can easily generate high level overview reports, see totals for each deliverable and set dependencies more efficiently.
For now, let’s focus on organizing those tasks in a meaningful way so you can easily generate high level overview reports, see totals for each deliverable and set dependencies more efficiently.
I’ll start by asking you a question: Have you ever seen a schedule where the task names were short paragraphs? (if there was an emoticon for eye rolling that is what you’d be seeing here) Perhaps you are guilty of this yourself, in which case I owe you an apology for virtually rolling my eyes at you. But seriously, STOP IT! Your task names should be brief and to the point. If you need to add more explanation use the tasks notes feature or link to another document but PLEASE stop entering paragraphs as task names.
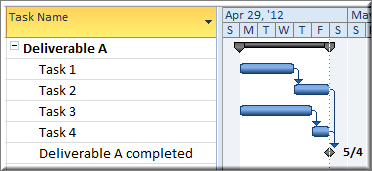
Hopefully, you are first creating a Work Breakdown Structure (a deliverable-oriented decomposition of the work to be completed) and organizing your deliverables. I won’t go into the details of what a WBS is or how to create one; you can find a ton of helpful information from www.pmi.org or just consult my good friend Google. Your project deliverables should always be entered as summary tasks in Microsoft Project and the steps required to complete the deliverables should be inserted as sub-tasks. At the end of each deliverable, add a milestone that marks the point at which the deliverable is completed.
It should look like this:
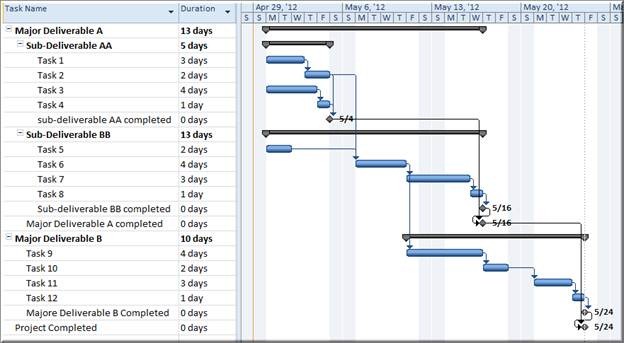
Using this model allows Microsoft Project to automatically generate the total cost, total duration and total work for each deliverable in your project. Not only that, but you can also easily create a high level report by simply applying the milestones filter. In addition to the benefits already mentioned, this model also simplifies capturing the relationships between the tasks and deliverables. How? Well, you’ll have to come back for Step 4 to find out!
Here’s a more detailed example of what this might look like in your schedule:
To sum it all up:
- Keep your task and deliverable descriptions short and sweet
- Deliverables should always be summary tasks
- Steps required to complete the deliverables should be sub-tasks
- Every deliverable should have a milestone at the end, marking its completion
So there you have it. Step 2: Enter the Tasks and Deliverables. Join me again next week to learn about Step 3: Entering the Estimates.
Happy Scheduling!
